- Posts are the entries that display in reverse chronological order on your home page or within your site. The content is constantly updated at the top of the page, instead of the whole page staying relatively the same over time – like the pages of your main navigation. Posts are more like your “News” page with new information posted at the top regularly. In contrast to pages, posts usually have comments fields beneath them and are included in your site’s RSS feed.
- You can add a new entry by clicking the [+NEW] button in the top bar and selecting New Post, or by clicking “Add New” under the subheading Posts in the left sidebar.
- If you have a latest posts widget enabled on the homepage, excerpts of the most recent entries will appear there, and all new posts will appear at the top of your blog page. They will all be archived as well.
- Enter the title at the top of the page. Right below the title you will see the permalink. This is what the link to the website page with the blog post will be named. Generally you can leave this as whatever it fills in for you as default. Any relevant words in this URL will help your SEO.
- Next is your WYSIWYG editor. (What You See Is What You Get) Which means you can see the edits you are making – as opposed to making changes in the HTML code. Here you type in the content of your post. You can use bold and italics, etc.
- If you want to make a headline or subheadline, use the formatting drop down menu – it says “format” (in a drop down option) and select paragraph or Headline 1, Headline 2, etc. Making an item a headline or subheadline will give those words extra SEO power (as opposed to using bold and size to make it just visually stand out on the page). Also, using the Headline tags will keep everything consistently styled on the site.
- To add a link, select the text within your post that you want to turn into a link (for example: “click here”). Once the text is selected, click the link button (looks like a chain link) in the WYSIWIG toolbar.
- A window pops up where you can type in the URL of the page you would like to link to. Check the box if you would like this link to open in a new window (recommended for any links leading off of your main website). If you want to link to a page already within your site, the pages are listed below – simply select one instead of entering a URL.
- Below this is the SEO (search engine optimization) box. You don’t have to fill in anything – site-wide defaults will be included if you leave these blank. If you want specific keywords added to a specific post, add them here. You can see what the page listing will look like on Google, and it is clear what to add where in this section.
- In the right column you can select what category the post belongs to (news, events, etc.) Normally you will only have one blog on your site and all posts in all categories will display on the main blog page – but should you decide one day to split your posts into categories, it will be convenient to have all old posts already tagged. Also, when someone views your posts they can click on the category it is in and see similar posts.
- If you want to add an image or a featured image to a page, see our page Working with Images in WordPress.
Lastly, at the top right is the Publish section. Click Publish to make the post live. If it was already live and you just modified it, click Update to make the changes live.
Category: HOW-TO
HOW TO: Remove an Agent from your “Meet The Team” Page
If you don’t have the automated “Agent Management” system on your website, you will need to add and remove agents manually from your site.
There are two places where agents are entered and configured in your website. One is the agent “account” which allows you to connect them to listings and enter their bio, photo and contact information. The other is the agent “post” which is simply the page on your website with information about that agent (and usually a list of their current listings).
When you are removing an agent from your system you need to both remove the agent account and the post in order to not have the agent appear anywhere on your website.
PART 1 – Removing the agent’s bio/listings page from your “Meet The Team” section on your website.
- Begin by logging into your site’s WordPress admin.
- Click on Posts > All Posts to view all of your website’s posts.
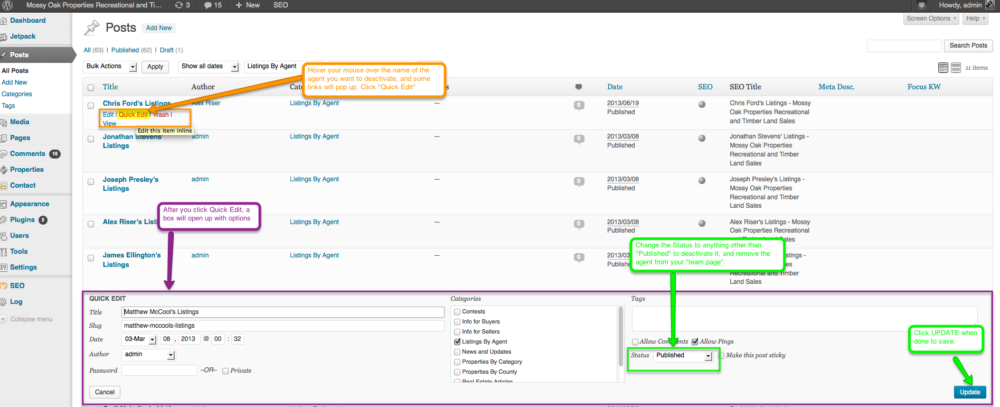
- Select “Listings by Agent” or “Agents” (or something similar) in the drop down box at the top of the page (see below, in orange). Now you will only see the posts for each agent on your team.
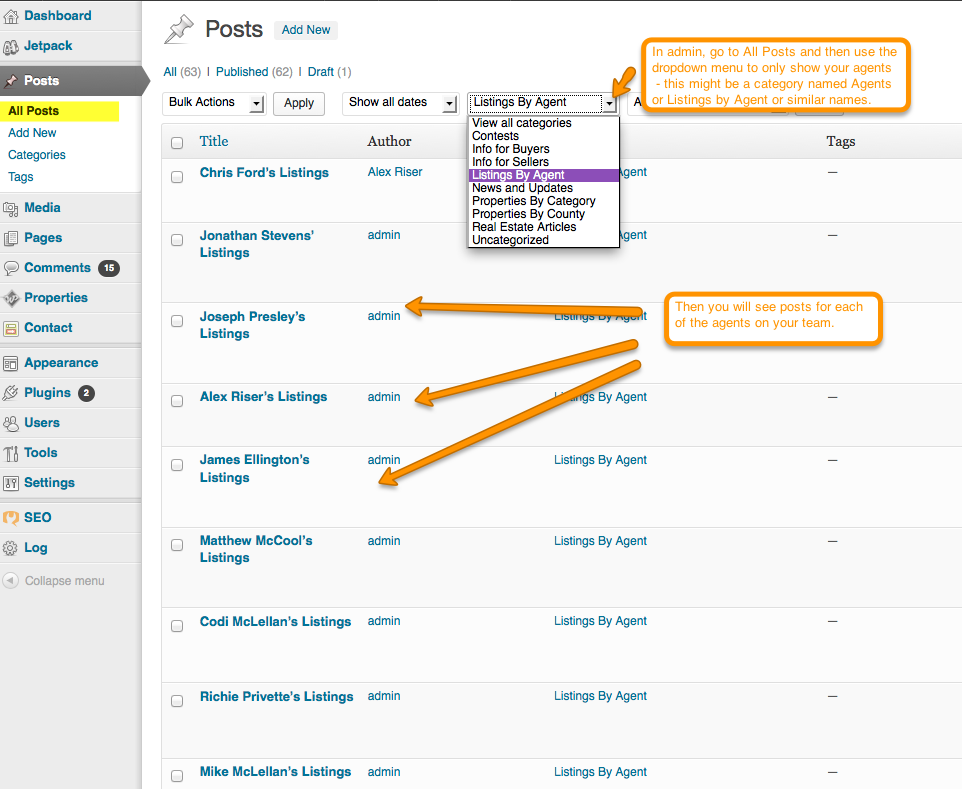
- Hover your mouse over the name of the agent you would like to remove, and links will appear below his or her name (see below in orange). Click “Quick Edit”.
- A box will appear (as seen in purple below) with some options. Next to Status, change the drop down to “Draft” instead of “Published”. Click Update to save your changes.
The page with this agent’s bio and listings will now be removed from the site, and the agent will no longer show on your Meet the Team page. If the agent should ever return to your team you can simply re-publish the page.
PART 2 – Removing the agent’s user account
- Begin by logging in to your WordPress admin panel.
- Click on Users on the left sidebar.
- Click on the individuals name to open the user account for editing.
- Find the drop down for “Role” (as seen below) and change their role to “No Role for This Site” to deactivate their account.
The agent will no longer have an account with your site and you will not be able to associate listings with that agent any more. If the agent should ever return to your team you can simply change the setting back to “Admin” or “Real Estate Agent” and all of their information will be still intact and the user will be active on the site again.
HOW TO: Find Out Latitude & Longitude of a Location in Google Maps
Sometimes, especially in rural areas, your property listing will not show up in the proper location on Google Maps. You can fix this by setting your own latitude and longitude coordinates for the location.
If you do not know the exact latitude and longitude of your listing, you can find it on Google Maps.
Here is how:
- Go to http://maps.google.com
- Enter an address or location, and press enter. This will bring you to the approximate location.
- Right click the Map in the EXACT location that you would like to know the coordinates of.
- An options box will appear, select “What’s Here” from the drop down menu.
- The latitude and longitude of the location will appear on the map.
- You can copy/paste these into your property listing.
Optional – Click the coordinates for more information about the area, or for both versions of the coordinates.
HOW TO: Edit an Image inside of WordPress
TO OPEN THE IMAGE FOR EDITING:
- Open the image that you would like to edit.
Click the product, property, post or page that you are editing and then click on the photo you want to edit, OR
Click on Media Library, find the image you want to edit and click to open it. - Click Edit Image link, which should be below or to the right of the image.
TO CROP THE IMAGE:
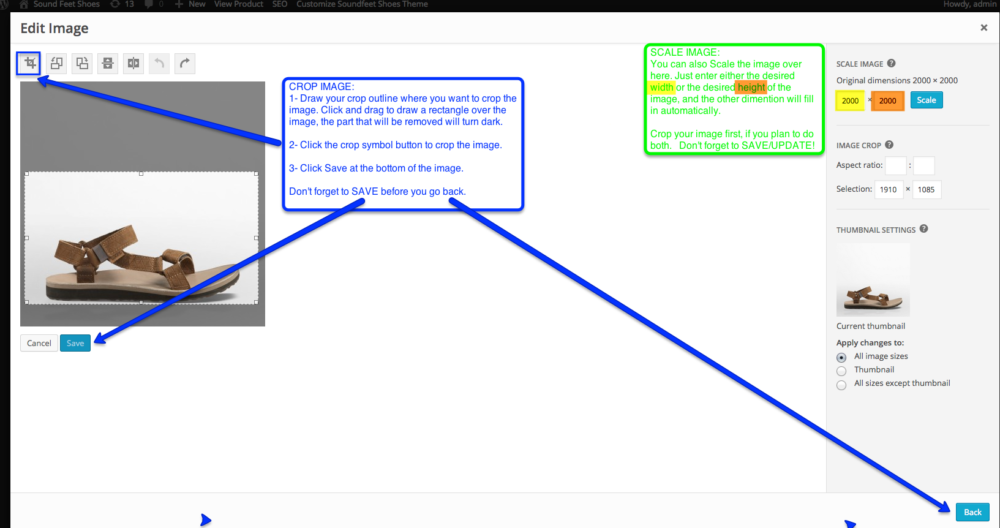
- Draw your crop outline where you want to crop the image. Click and drag to draw a rectangle over the image, the part that will be removed will turn dark.
- Click the crop symbol button to crop the image.
- Click Save at the bottom of the image. Don’t forget to SAVE before you go back!
TO SCALE THE IMAGE:
Crop your image first, if you plan to do both.
- You can also Scale the image over on the right side of the screen. Just enter either the desired width or the desired height of the image, and the other dimension will fill in automatically.
Don’t forget to SAVE/UPDATE!
HOW TO: Add Images to a Property Listing
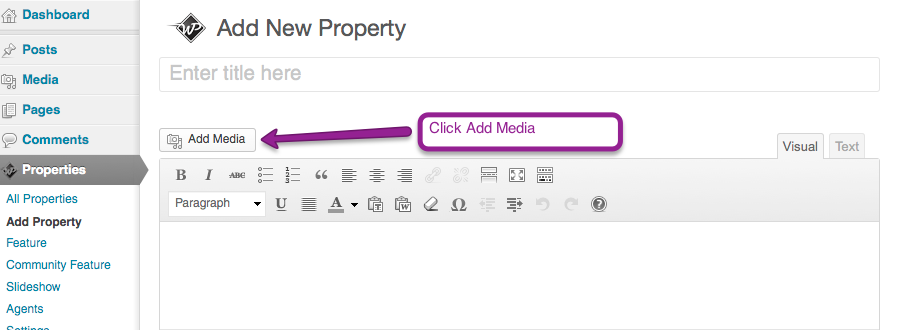
- Click “Add Property” in left side menu.
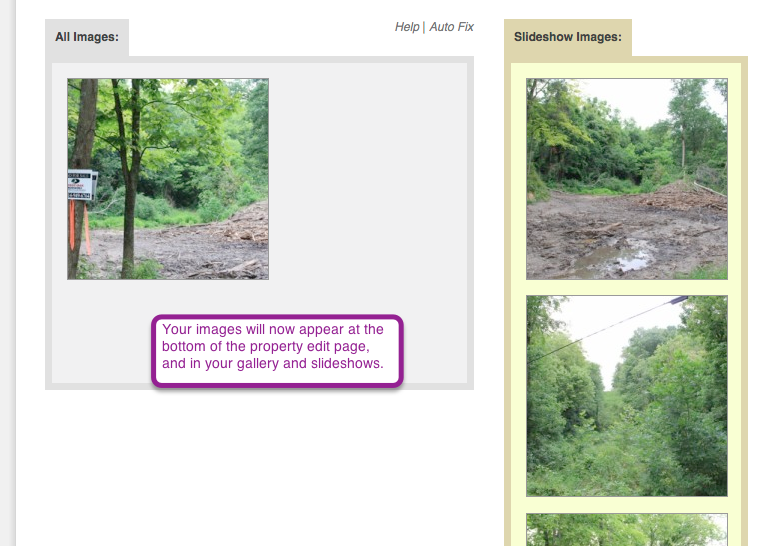
- Click “Add Media” above the text area.
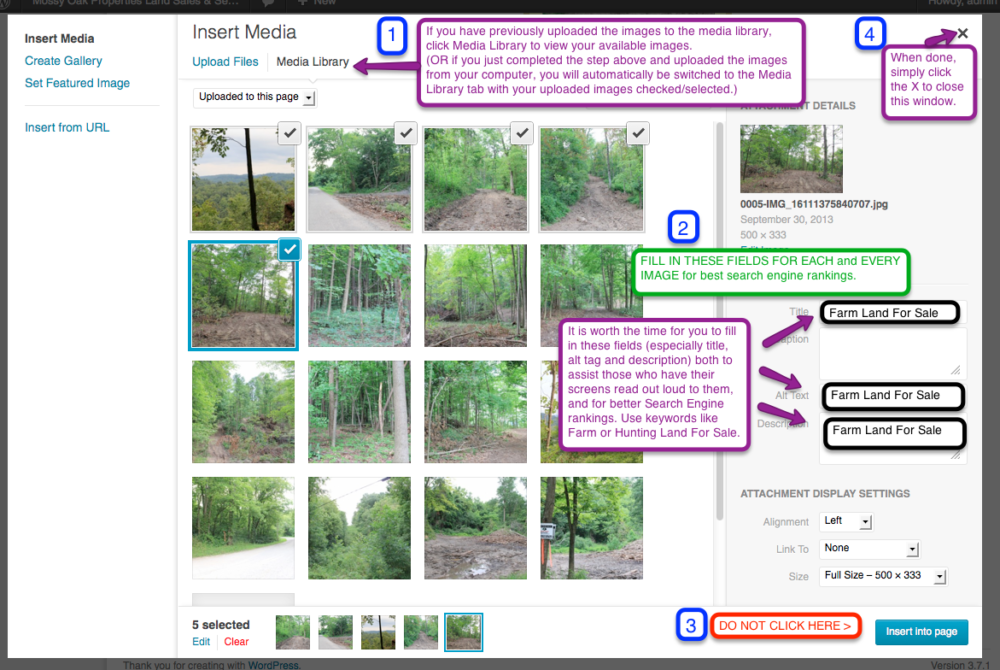
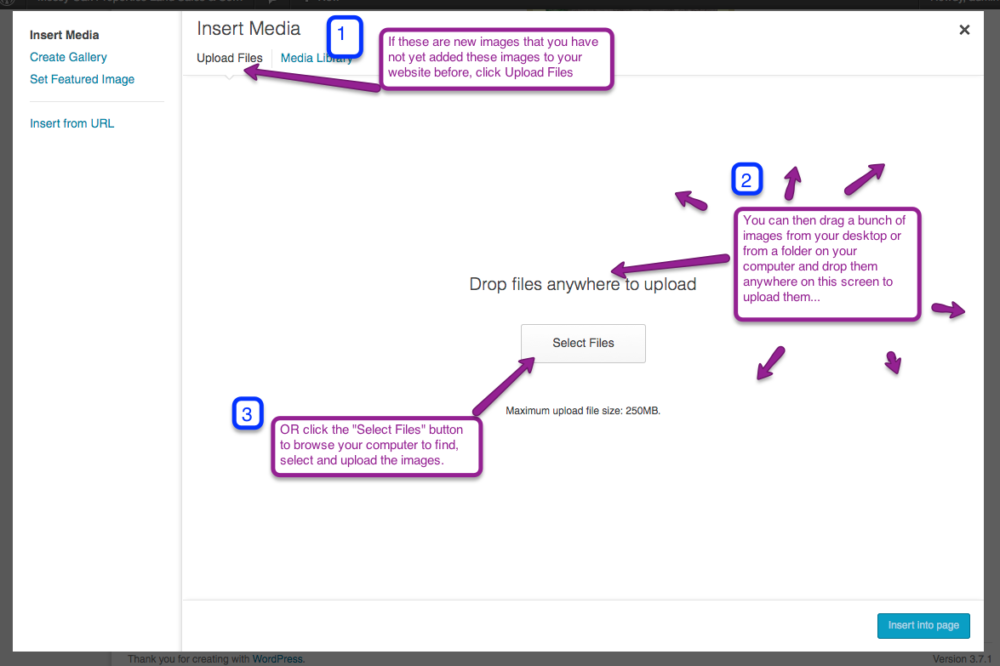
- A box will pop up called the “Insert Media” window.
HOW TO: Add an Agent to your “Meet The Team” Page
If you don’t have Automatic Agent Management then you will need to add new agents to your website individually. Here’s how:
There are two places where agents are entered and configured in your website:
- One is the agent “account” which allows you to connect them to listings and enter their bio, photo and contact information.
- The other is the agent “post” which is simply the page on your website with information about that agent (and a list of their current listings).
When you are adding an agent to your system you need to both create the agent account and add the post (page) in order to have the agent appear on your website. This article will show you how to do both.
Part 1 – Create the Agent’s Account
- Log in to your website’s WordPress admin panel.
- In the left column select Properties > Agents
- In the Agent Section, click “Add New” to add a new Agent. (You can also click on an Agent’s Name, or below the name click “edit”, to edit an existing Agent Profile.)
- Enter the name and contact information of the agent as shown below.
- There are two bio sections, one is a “full bio” and the other is a “widget bio“.
For the Full Bio, feel free to enter an extensive biography for the agent. This will only show up on the site on the agent’s individual page with their photo, bio and listings.
For the Widget Bio, enter a shorter version or a selection from the full biography. This will show as a small box of content on each of the agent’s listings. - In the right column of the Agent Profile you will see a section towards the bottom called “Images”. (You may have to save the agent first before you see the button to “Add Images”). Click “Add Image” and select or upload the image you want for the Agent Profile. If you have not previously used the image on your website this will automatically import the image into your media library after saving.
- “Save” or “Update Agent” when you are done to save all of your changes.
=======
Part 2 – Create the page on the website where the agent’s bio, photo and list of active listings will display.
- In the WordPress admin panel, left sidebar menu, select Posts > Add New to create a new Post for the agent.
- Next, in the tabs on the top right corner of the box where you add your content, select “text” instead of “visual”, as shown below in blue.
- Copy and paste this code into the editor:
[agent_card user_id=X fields=agent_image,display_name,phone_number,mobile_phone,fax,user_email]
[clearboth]
[agent_card user_id=X fields=full_bio]
[divider]
<h5>My Listings</h5>
[property_overview wpp_agents=X sorter=on sort_by=price sort_order=DESC per_page=300 status="New,Reduced,Pending,Active"]
- Find the three places in the code where there is an “X” and replace the X with the agent’s ID number in all three places.
Find your agent ID by clicking on Properties > Agents in the left side menu, and looking in the first column, as shown below:
- Next add the agent’s image as the post’s featured image by clicking “Add New” below “Featured Image” in the right column, towards the bottom of the page. If you have already setup the agent’s user account, their photo should be in the Media Library, so browse to the agent’s photo in the WordPress Media Library, fill out the appropriate information for your photo and save your changes.
- Click on “Agents” or “Listings by Agents” in the right column under “Categories”.
- Next scroll to the bottom of the page and find the “Excerpt” section. (If you don’t see the except section box, look at the very top of your browser and click the button that says “Screen Options” and make sure the “Excerpt” option is checked.)
- Copy and Paste the following code into the excerpt box to display the agent’s information on the main Meet The Team page:
<strong>Office:</strong> 123-456-7890<br /> <strong>Mobile:</strong> 123-456-7890<br /> <a href="mailto:yourname@websitedomain.com">yourname@websitedomain.com</a>
*Don’t forget to replace the 123-456-7890 with the correct phone number, and replace BOTH instances of yourname@websitedomain.com with the agent’s correct email address.
- Scroll to the top of the page and click Update to save all of your changes.
HOW TO: Add a Property Listing to Your Website
Your website may not look exactly like the one in the images, however the general directions still apply to you.
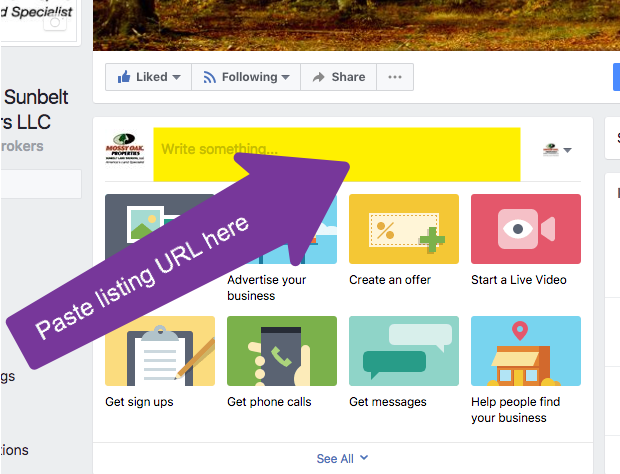
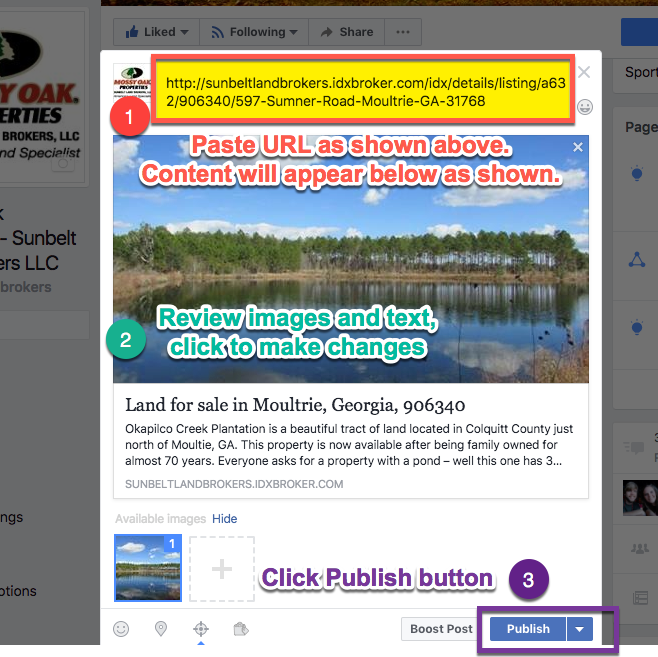
HOW TO: Manually Add IDX Listings to your Company Facebook Page
Before you begin, visit the listing on your website and copy the URL from the page, ex: http://yourwebsite.com/idx/details/listing/1234/123456/awesome-listing-town-state
HOW TO: Display SOLD Listings on your IDX website.
1- Log in to your IDX dashboard here:
https://middleware.idxbroker.com/
You should already have your username and password.
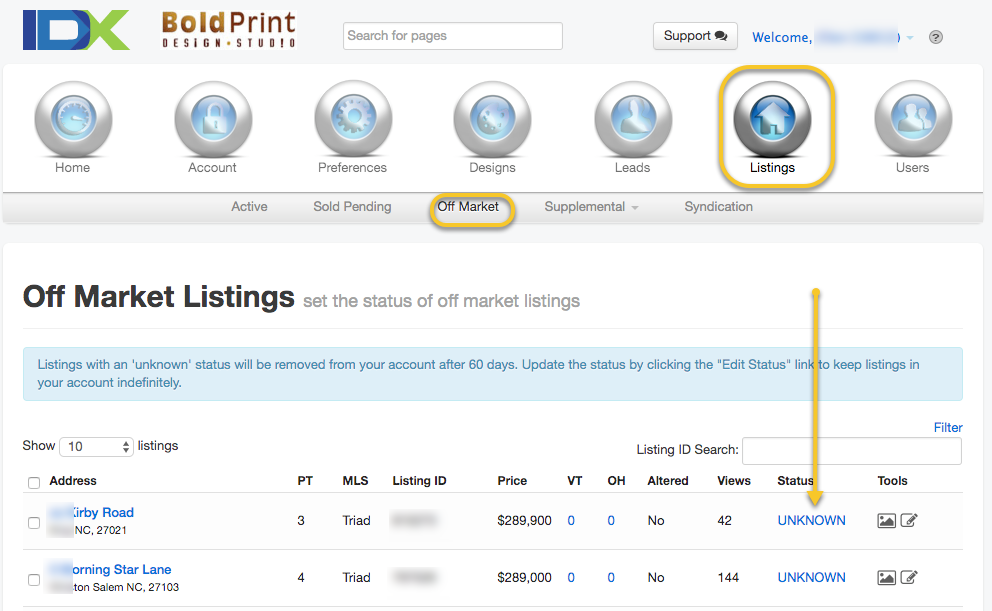
2- Click on Listings > Off Market and you will see all of your off market listings.
This could include listings that are sold OR pending, cancelled, expired, or just “Off Market”. We do not receive sold and pending listing data from the MLS, so we will not know the actual status of the listing. All listings will initially be listed with a status of “Unknown”.
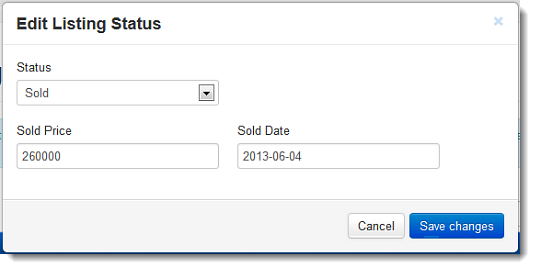
3- Click on the status to change it to the appropriate status for that listing.
4- A pop-up box will open, where you can set the status of the listing. You can also enter the Sold Date and Sold Price if you like.
Edit Status
The updated listings (with a status other than UNKNOWN) will now appear on your Sold/Pending page.
Listings with an ‘unknown’ status will be removed from your account after 60 days. Update the status to keep listings in your account indefinitely.
HOW TO: Add a specific set of Properties to a Property Category page by MLS #
1- Log in to your IDX dashboard here:
https://middleware.idxbroker.com/mgmt/
You should already have your username & password.
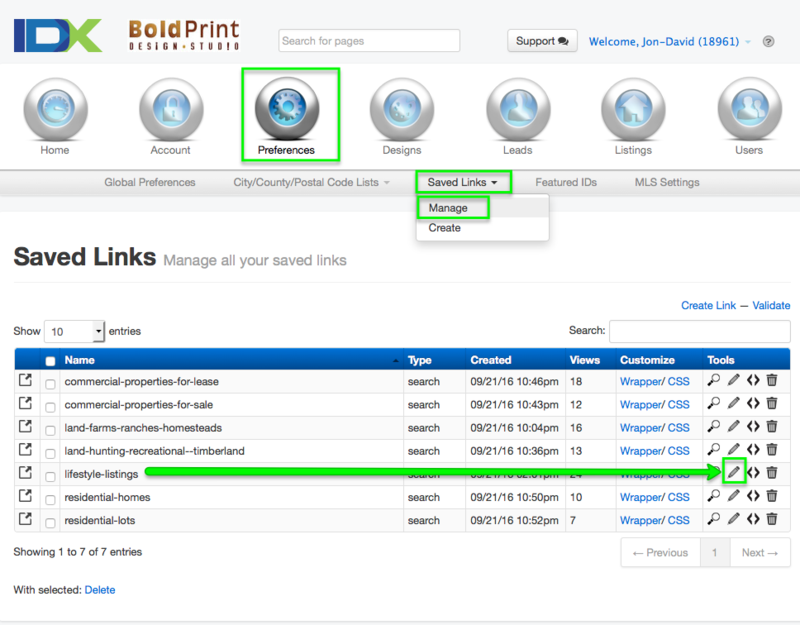
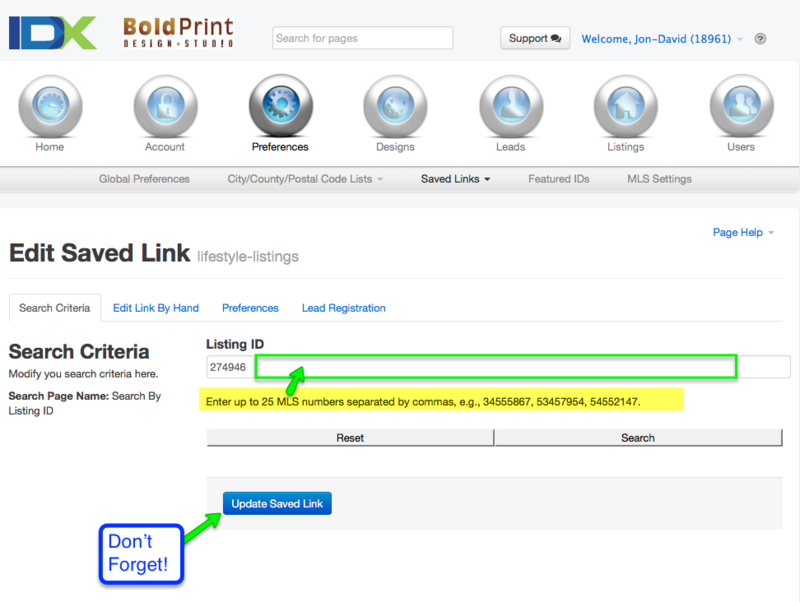
2- Click on Preferences > Saved Links > Manage and you will see all of your Property Categories. Click on the pencil icon the one you want to edit.
3- On the next screen, type in the MLS #s for all of the properties that you want to appear on the page; separate the numbers by a comma.
Don’t forget to save!
The properties will be removed from the page automatically if they go off-market or sell, so you need to go in from time to time and add more MLS #s to keep the page populated.