Posted on

HOW TO: Add or Edit an Agent Report

Add or Edit a Report

  1. Go to your report page at yourwebsite.com/my-reports (change yourwebsite.com to your actual website URL)
  2. Click the “Log In” link to log in, if you are not logged in already
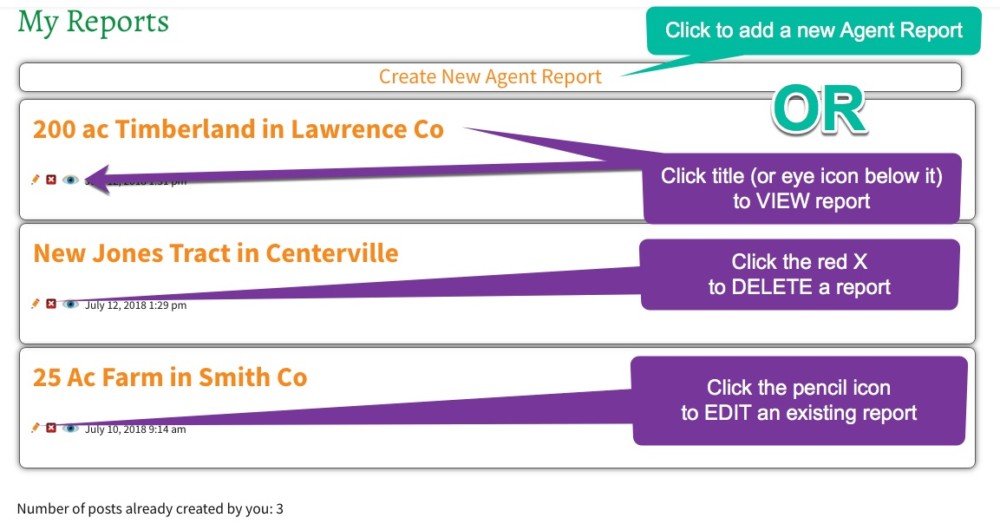
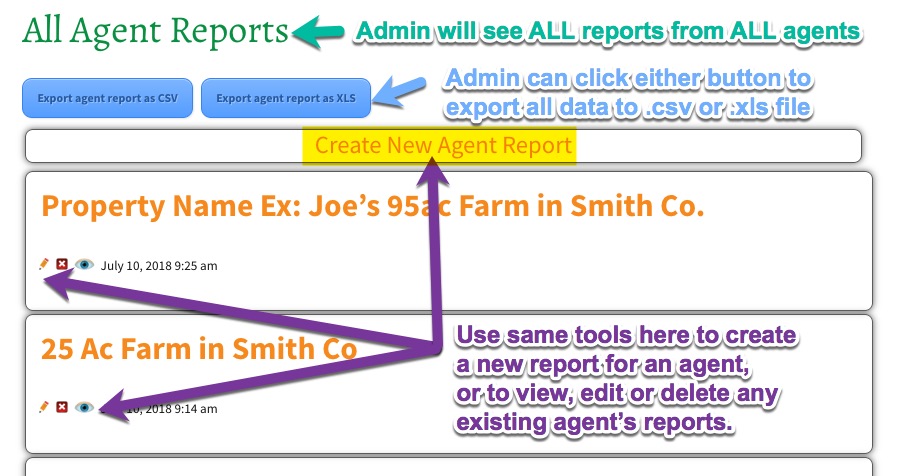
  3. You will see a button at the top to add a new Agent Report, and also a list of all of your existing Agent Reports
    1. Click the title or eye icon to VIEW a report
    2. Click the red X icon to DELETE a report
    3. Click the pencil icon to EDIT a report

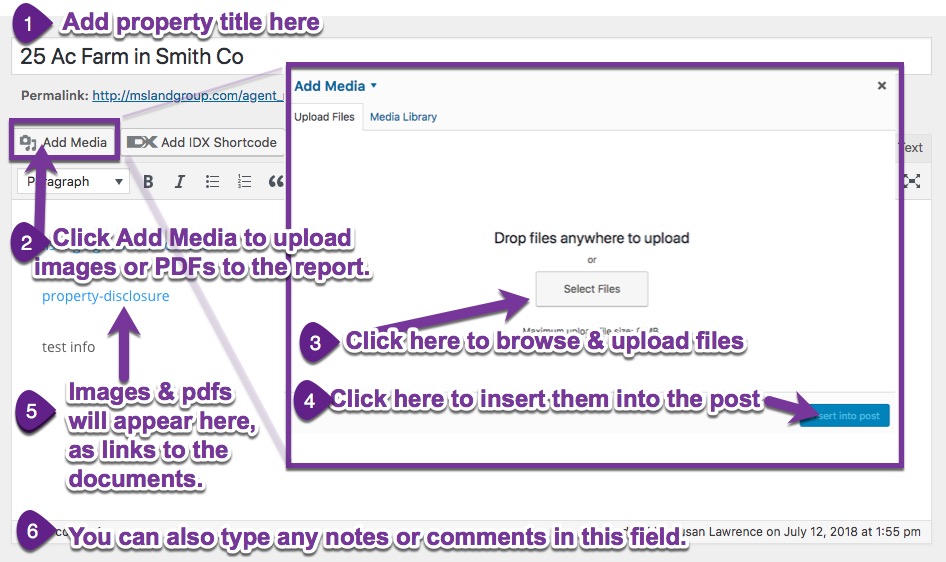
Add title, comments and media (images & PDFs) as needed


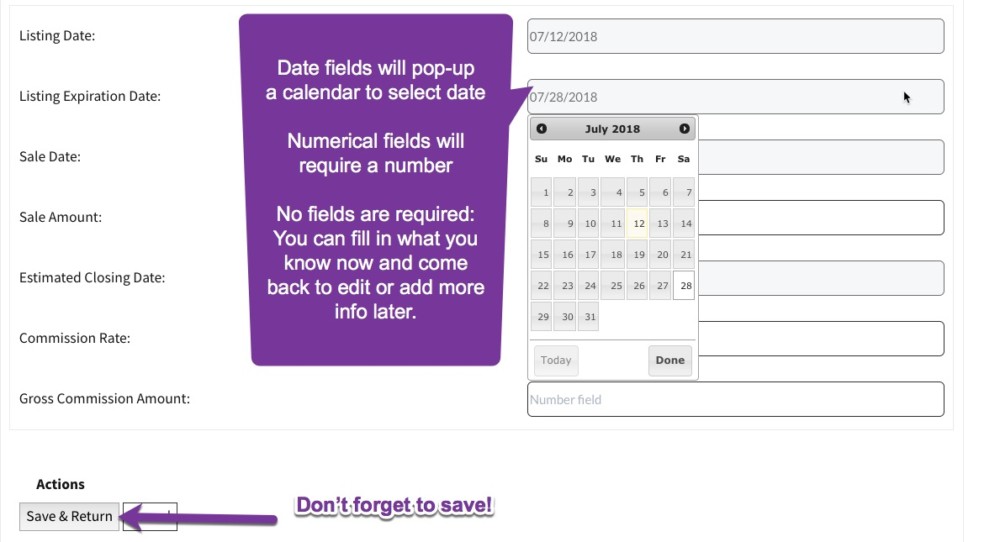
Scroll down to “Custom Fields” and add data for listing shown below:

Posted on

HOW TO: Add an Agent to your Agent Reporting System

The website management will need to add new agents to the admin area in WordPress before the agent can submit reports.
NOTE:The agents will NOT have access to any other admin areas, only their own reports.

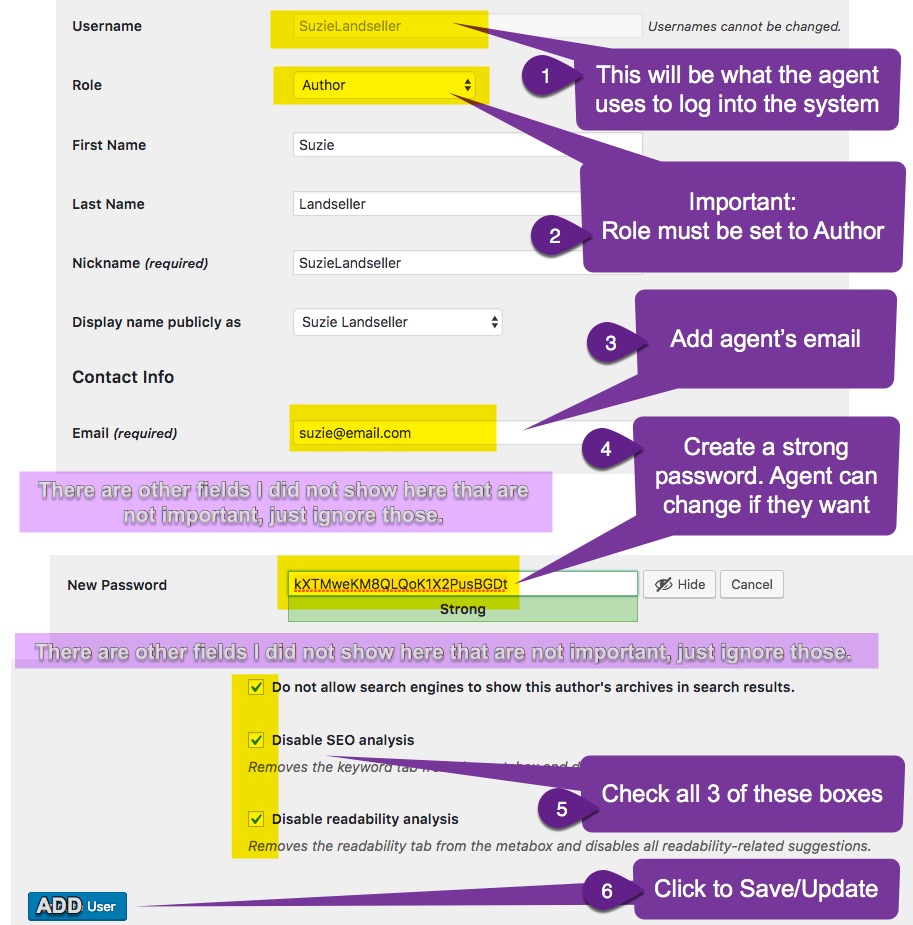
  1. Log into WordPress Admin and click on Users > Add New in the left side menu
  2. Fill in fields as shown above
  3. Save.

The agent should be able to log into the Agent Reporting System immediately. The agent can click “Forgot My Password” to get an email with a link to reset their password to something new.
Posted on

HOW TO: Add a Virtual Tour to a Listing

You can easily add virtual tours to your listings by clicking Listings in the main menu, and Active in the submenu.

Navigation

Virtual tours are listed in the “VT” column. To enter in a new virtual tour, click the number under the VT column for the listing you would like to edit.

virtual tour

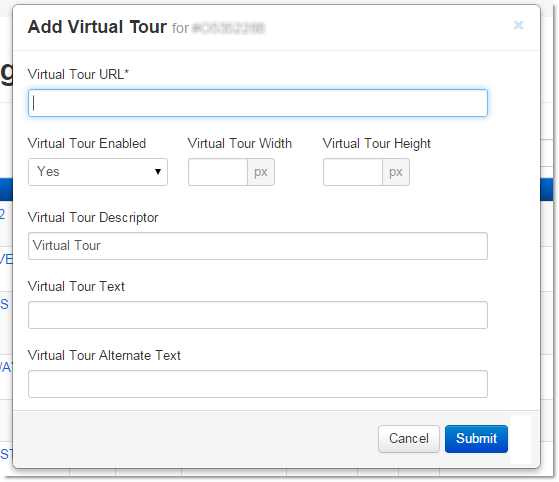
A pop-up box will appear where you can enter in information about the virtual tour. In the Virtual Tour URL field, be sure to enter in the entire link for your virtual tour, including the http://. Make sure Virtual Tour Enabled is set to Yes, and enter in a width and height for the the pop-box that will display your virtual tour. Enter in the rest of the details, and then click Submit.
new virtual tour

You can view the virtual tour on a listing by viewing its search results or property details IDX page.

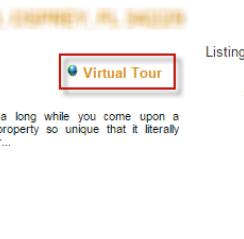
Virtual tour button

Note: In many cases, a virtual tour may be automatically linked to a property by the MLS, requiring no action on your part.
Posted on

HOW TO: Clear your browser’s cache

What is browser cache?

When you view a website in a browser, your computer downloads every item on the site (the logo, text, photos, etc.). This is why a website with many large images will take longer to load, because there is a lot of content to download to your computer before you can view it.  Web browsers download the files, and stores them on your computer’s hard drive in a temporary folder.

So when you visit the same page for a second time, the browser speeds up display time by loading the website files from your computer’s hard drive cache, instead of downloading everything again.  These downloaded and stored website files are called “Cache” files, or “Internet Cache” or “Temporary Internet Files”.

Why do I need to clear it?

Sometimes your browser may not see that there is something new and it will continue to display the files from your hard drive instead of downloading new files from the site. So, by deleting the stored files from your cache and then returning to the site, your browser is forced to download all new files, so you are sure to be seeing the most up-to-date content.

How do I do it?

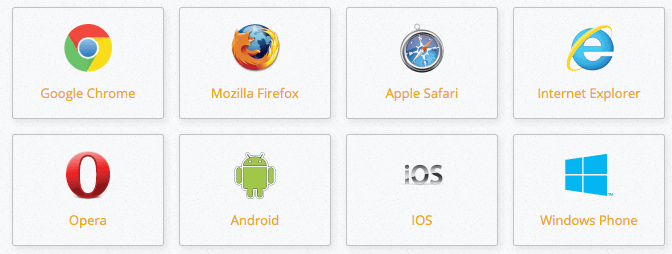
It depends on which browser you are using, whether Google’s Chrome, Mozilla’s Firefox, Microsoft’s Internet Explorer, Mac’s Safari or others. Click the button below to go to a website that shows you simple directions for all browser types.

Learn How to Clear Your Cache


What if it doesn’t work?

In the same way that your web browser has a cache of recent web pages, your Internet Service Provider (ISP) may be doing some additional caching for you, to make your internet speed even more fast. In some (rare) cases, site content won’t update because your ISP is showing you their cached files. When this happens, you will have to talk with your ISP to fix the problem by asking them to clear your cache on their end. We are happy to speak with them on your behalf if you would like, just ask!
 

Posted on

HOW TO: Select Which Images Display in the Global Slideshow

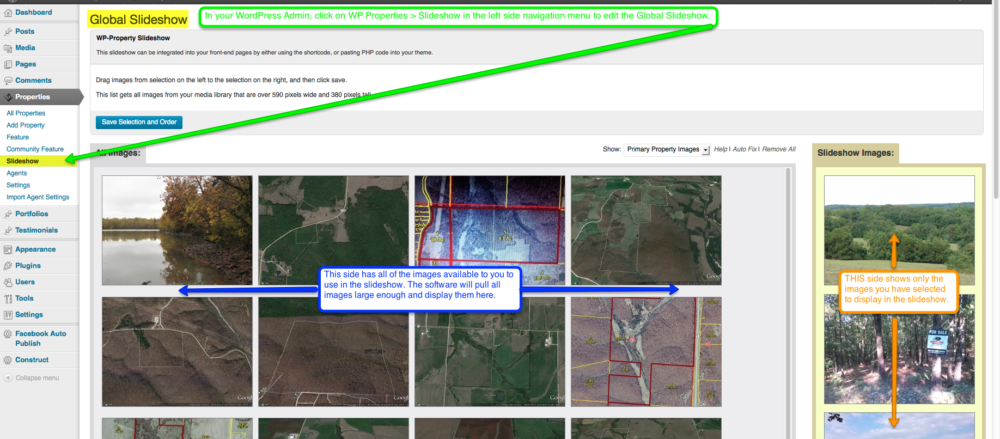
The Global Slideshow is an automatic image slideshow displaying images of all of your listings.

The website software will select all images that are large enough for your slideshow dimensions and add them to the slideshow for you. It will also create a title for the slideshow image based on the property title. And, all images will automatically link to the listing that the image is from, so site visitors can click on any image they like, and it will bring them right to the listing.

While the automatic slideshow creation is helpful if you would like less maintenance on your website, sometimes you might want to control which images show and even what order. This system allows you to do just that.

Follow the directions in the images to see how to modify the slideshow.


If you would like to change what images you have to select from in the left side:


Once you have determined which images will be in the left side box as options for your slideshow, next you can determine which images of these you will actually include in the slideshow.

The easiest way is to simply click “Auto Fix” (seen in the above image) which will move all images that are too small to the left box (so they will not appear in the slideshow) and moves all images that ARE large enough into the right-side gold colored box, and these images will show in the slideshow.

Another tool is the “Remove All” link (also seen in the above image) which will move ALL images from the gold Slideshow Images box on the right, to the All Images box on the left. This will leave your slideshow empty, so after you do this you will want to manually move some images into the gold box in order to have images display in the slideshow.

Whether starting from empty after clicking “Remove All” or starting with some images already in the gold Slideshow box, you can add more images to the Slideshow by simply clicking on an image in the left side box and dragging it to the gold box on this page. You can also drag and drop the images in the gold box UP and DOWN to rearrange them.


And most importantly:


Posted on

HOW TO: Edit a Menu in WordPress

In this tutorial you will learn how to Add, Remove, and Edit Menus on your WordPress website.

Menus work in a hierarchy system that distinguishes each of the different menu items by name and by placement. The Menu Items at the top of the list in the Editor will appear on your website from left to right.
To CREATE A MENU

  1. If you’re logged into your site, find Appearance in the main dashboard, and in the drop down menu select Menus.
  2. In the Menu page of the editor click the blue Link that says Create a New Menu.
  3. You will be prompted to Give your Menu a Name.
    You can have more than one menu but only one Main Menu so its suggested that you name it something like “Primary”, “Main Menu”, or “Main Navigation”. Basically just something that will distinguish it from the other menus you may create in the future for a header, footer, or sidebar.
  4. Next set the Menu Structure.
    If you want this menu to be your Main Menu check the Primary Menu checkbox.
  5. Click Save Menu.

To ADD MENU ITEMS

  1. Now that your Menu Structure is set up, look in the Box on the Left that says Pages.
  2. Click the empty box to place a checkmark in each box you want to place in the menu and click Add to Menu.
  3. The selected pages will appear at the bottom of the menu under Menu Structure.
  4. Scroll down to where it appears on the menu and hover to get the 4 directional arrow icon to appear, then click and drag it to where you want it on the menu. The menu items will “Snap” into place.
  5. When you have all of the Pages in the correct order make sure to click Save Menu to save your changes.

To EDIT MENU ITEMS

  1. You may not want to have the Full Name of the Page appear in your Menu. For instance you may have a page named “Frequently Asked Questions”. But we want it to say “F.A.Q.” on the Menu Label.
  2. Its easy, in the menu editor, look on each individual menu item. On the right it says “Page”, and there is a small Down arrow next to. Clicking this link or arrow will open the Menu Item up for editing. This option allows you to add a Navigation Label (Button Name) and Title Attribute (optional). *You can also remove menu items by clicking the Red text Remove.
  3. Once you have changed the Navigation Labels to the correct name, click Save Menu to save your changes.

To CREATE A DROP DOWN MENU

  1. If you want your Main Menu Navigation to have sub pages and you also want them to appear on the menu you need to create a drop down menu. A Drop Down Menu allows you to have multiple pages underneath a Main Menu Item. (See Below.)
  2. In the Pages panel on the left, check mark each additional boxes you want to place in the menu and click Add to Menu. Remember, the new menu items will appear at the bottom of the list. You then have to put each menu item in its correct location on the menu.
  3. Scroll down to where it appears on the menu and hover to get the 4 directional arrow icon to appear, click and drag it to where you want it on the menu, the Menu Item will “Snap” into Place.
  4. Place the rest of the sub items directly under the first sub menu Item.
  5. Click Save Menu to save your changes.
Posted on

HOW TO: Add / Edit a Post in WordPress (Ex: to Your News & Updates or Blog Page)

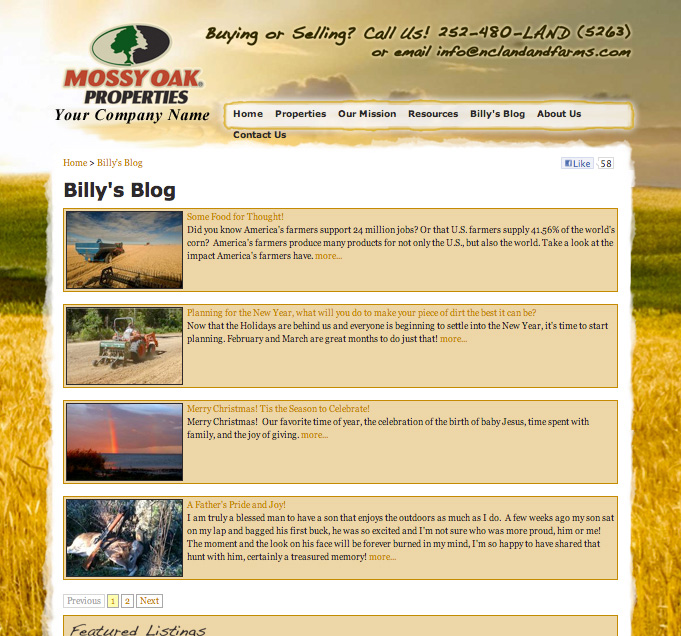
NC Land & Farm Billy's Blog
  1. Posts are the entries that display in reverse chronological order on your home page or within your site. The content is constantly updated at the top of the page, instead of the whole page staying relatively the same over time – like the pages of your main navigation. Posts are more like your “News” page with new information posted at the top regularly. In contrast to pages, posts usually have comments fields beneath them and are included in your site’s RSS feed.
  2. You can add a new entry by clicking the [+NEW] button in the top bar and selecting New Post, or by clicking “Add New” under the subheading Posts in the left sidebar.
  3. If you have a latest posts widget enabled on the homepage, excerpts of the most recent entries will appear there, and all new posts will appear at the top of your blog page. They will all be archived as well.
  4. Enter the title at the top of the page. Right below the title you will see the permalink. This is what the link to the website page with the blog post will be named. Generally you can leave this as whatever it fills in for you as default. Any relevant words in this URL will help your SEO.
  5. Next is your WYSIWYG editor. (What You See Is What You Get) Which means you can see the edits you are making – as opposed to making changes in the HTML code. Here you type in the content of your post. You can use bold and italics, etc.
  6. If you want to make a headline or subheadline, use the formatting drop down menu – it says “format” (in a drop down option) and select paragraph or Headline 1, Headline 2, etc. Making an item a headline or subheadline will give those words extra SEO power (as opposed to using bold and size to make it just visually stand out on the page). Also, using the Headline tags will keep everything consistently styled on the site.
  7. To add a link, select the text within your post that you want to turn into a link (for example: “click here”). Once the text is selected, click the link button (looks like a chain link) in the WYSIWIG toolbar.
  8. A window pops up where you can type in the URL of the page you would like to link to. Check the box if you would like this link to open in a new window (recommended for any links leading off of your main website). If you want to link to a page already within your site, the pages are listed below – simply select one instead of entering a URL.
  9. Below this is the SEO (search engine optimization) box. You don’t have to fill in anything – site-wide defaults will be included if you leave these blank. If you want specific keywords added to a specific post, add them here. You can see what the page listing will look like on Google, and it is clear what to add where in this section.
  10. In the right column you can select what category the post belongs to (news, events, etc.) Normally you will only have one blog on your site and all posts in all categories will display on the main blog page – but should you decide one day to split your posts into categories, it will be convenient to have all old posts already tagged. Also, when someone views your posts they can click on the category it is in and see similar posts.
  11. If you want to add an image or a featured image to a page, see our page Working with Images in WordPress.
    Lastly, at the top right is the Publish section. Click Publish to make the post live. If it was already live and you just modified it, click Update to make the changes live.