If you don’t have Automatic Agent Management then you will need to add new agents to your website individually. Here’s how:
There are two places where agents are entered and configured in your website:
- One is the agent “account” which allows you to connect them to listings and enter their bio, photo and contact information.
- The other is the agent “post” which is simply the page on your website with information about that agent (and a list of their current listings).
When you are adding an agent to your system you need to both create the agent account and add the post (page) in order to have the agent appear on your website. This article will show you how to do both.
Part 1 – Create the Agent’s Account
- Log in to your website’s WordPress admin panel.
- In the left column select Properties > Agents
- In the Agent Section, click “Add New” to add a new Agent. (You can also click on an Agent’s Name, or below the name click “edit”, to edit an existing Agent Profile.)
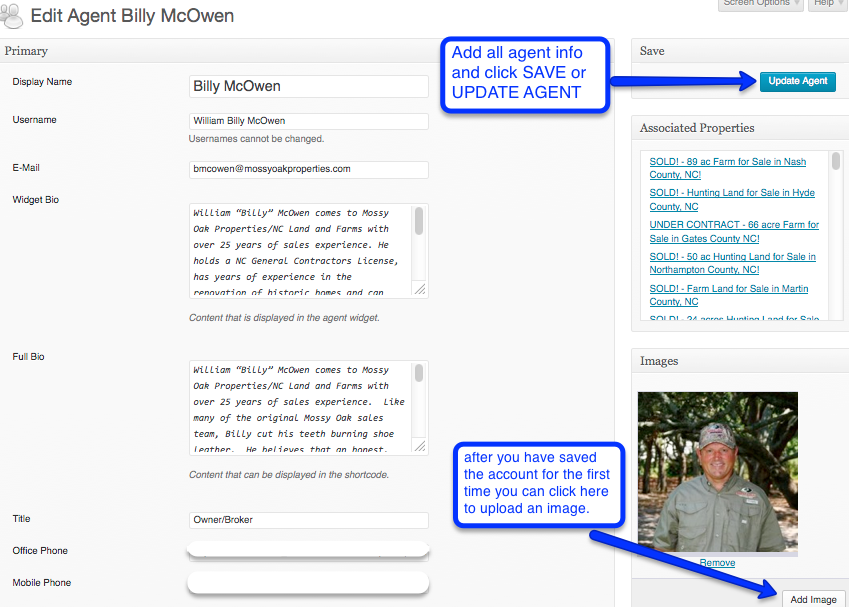
- Enter the name and contact information of the agent as shown below.
- There are two bio sections, one is a “full bio” and the other is a “widget bio“.
For the Full Bio, feel free to enter an extensive biography for the agent. This will only show up on the site on the agent’s individual page with their photo, bio and listings.
For the Widget Bio, enter a shorter version or a selection from the full biography. This will show as a small box of content on each of the agent’s listings. - In the right column of the Agent Profile you will see a section towards the bottom called “Images”. (You may have to save the agent first before you see the button to “Add Images”). Click “Add Image” and select or upload the image you want for the Agent Profile. If you have not previously used the image on your website this will automatically import the image into your media library after saving.
- “Save” or “Update Agent” when you are done to save all of your changes.
=======
Part 2 – Create the page on the website where the agent’s bio, photo and list of active listings will display.
- In the WordPress admin panel, left sidebar menu, select Posts > Add New to create a new Post for the agent.
- Next, in the tabs on the top right corner of the box where you add your content, select “text” instead of “visual”, as shown below in blue.
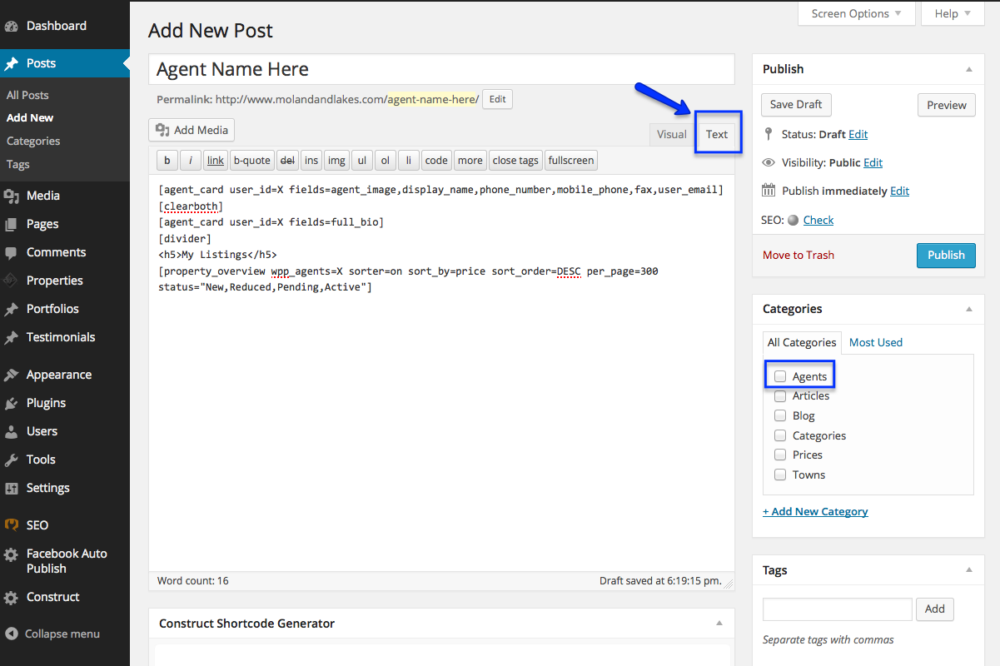
- Copy and paste this code into the editor:
[agent_card user_id=X fields=agent_image,display_name,phone_number,mobile_phone,fax,user_email]
[clearboth]
[agent_card user_id=X fields=full_bio]
[divider]
<h5>My Listings</h5>
[property_overview wpp_agents=X sorter=on sort_by=price sort_order=DESC per_page=300 status="New,Reduced,Pending,Active"]
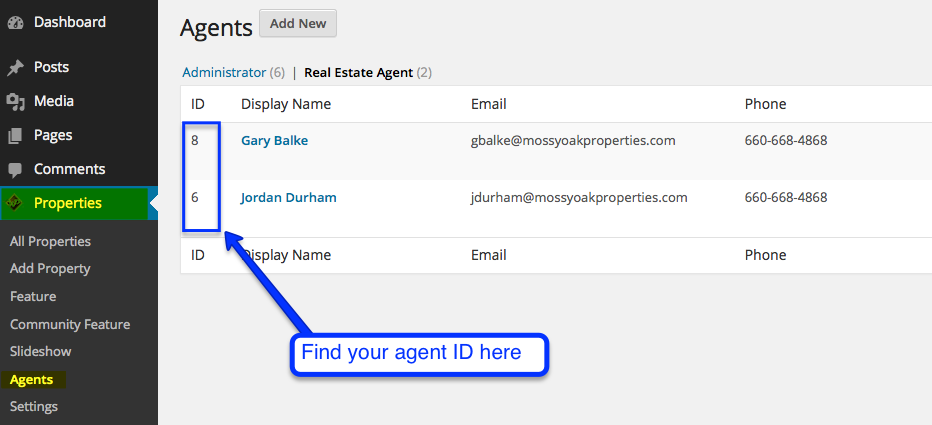
- Find the three places in the code where there is an “X” and replace the X with the agent’s ID number in all three places.
Find your agent ID by clicking on Properties > Agents in the left side menu, and looking in the first column, as shown below:
- Next add the agent’s image as the post’s featured image by clicking “Add New” below “Featured Image” in the right column, towards the bottom of the page. If you have already setup the agent’s user account, their photo should be in the Media Library, so browse to the agent’s photo in the WordPress Media Library, fill out the appropriate information for your photo and save your changes.
- Click on “Agents” or “Listings by Agents” in the right column under “Categories”.
- Next scroll to the bottom of the page and find the “Excerpt” section. (If you don’t see the except section box, look at the very top of your browser and click the button that says “Screen Options” and make sure the “Excerpt” option is checked.)
- Copy and Paste the following code into the excerpt box to display the agent’s information on the main Meet The Team page:
<strong>Office:</strong> 123-456-7890<br />

<strong>Mobile:</strong> 123-456-7890<br />

<a href="mailto:yourname@websitedomain.com">yourname@websitedomain.com</a>
*Don’t forget to replace the 123-456-7890 with the correct phone number, and replace BOTH instances of yourname@websitedomain.com with the agent’s correct email address.
- Scroll to the top of the page and click Update to save all of your changes.